TrailDamage.com

Photos, videos and information about 4x4 trails in Colorado and Utah

  • Trails
    • Colorado
    • Utah
  • Reports
    • Featured Photos
    • Featured Videos
    • Reports Calendar
  • Members
  • Search
  • Trail Damage Winners
  • FAQ
  • Community
  • Upcoming Events
  • Membership
  • Log In
  • Facebook
  • Instagram
  • RSS
  • Twitter
  • YouTube

Independence Trail 100627

June 27, 2010 by Monica

Independence Trail

Trail Run on June 27, 2010
Report and photos by Monica I., Trail Leader
View trail information for Independence Trail

Bob S.
Green 1997 Jeep Wrangler
Mark U.
Red 1989 Jeep Wrangler
Robert M.
Green 1987 Jeep Wrangler

After getting to the end of Liberty Trail confidently, we had decided that we were going to exit out of the Penrose trail system via Independence Trail. There were at least a dozen vehicles at the bottom of the trail, so we had to shuffle some vehicles around with other groups in order to get access to the start of the trail.

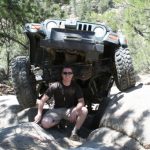
Mark was the first to climb up Bunker Hill which was an instant adrenaline rush. He got to the first wall of rocks and got off camber enough to put him on his passenger side. Teetering high in the air, he motioned to the others to grab his winch cable. Robert hooked him up to a nearby winch point and he was able to bring his Jeep back down on all fours. He even continued up without any further winch assistance.

The second section of Bunker Hill gave him a little more trouble, but he still was able to get over it. He would be the only one to get through the top part of the obstacle without needing a winch.

Bob was next to try Bunker Hill. It was everyone's first time climbing the obstacle, and we all had to really work at getting the right line. Bob also needed a bit of winch assistance and got a bit tippy in the same spot that Mark did. At that point, it started to rain and everything changed. There was dirt on the slippery rocks that turned slick, and tires couldn't grip the rocks very well. Bob gave it his best but he ended up winching out of the obstacle.

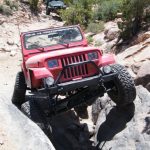
Robert was last up the obstacle, and he drove up the rocks at the very bottom without needing any assistance. But then, after clearing the tough section, his rear axle just didn't want to clear the boulder at the top of it. He kept working it back and forth, and after Mark stacked a bit of rocks in the rear Robert was able to lift his differential up just enough to clear it.

He then continued up to the last part of Bunker Hill. Taking a few different lines on the last section caused a huge wheel stand and almost sent him over on his top. If it wasn't for split-second thinking to let off the brake and let the Jeep roll backwards a bit he would have definitely rolled in a bad way.

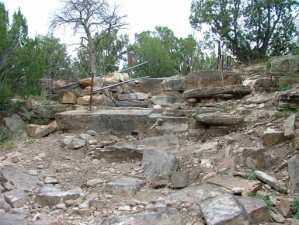
After all of us got calmed down from the mayhem of Bunker Hill, we decided to finish up with Indy's exit rather than go up Freedom Trail. Freedom Trail looked too easy. We enjoyed the rocky trail and it wasn't too long before we were at the exit for Independence.

Mark got up to the exit and was able to get up the first section. That's when things got a little crazy. Just when you think that you're home free and the dirt-road exit is right in front of you, this trail lets you know that you're not done yet! Mark worked for several minutes trying to get over the very last wall trying several lines. His passenger lower control arm was taking a beating and was preventing him from clearing the obstacle. With Robert's spotting skills, he was able to find a line that worked and he bumped his rear up and off the trail.

Bob came next and ran into similar problems that Mark had found. He had worked a very large flat boulder away from the first section that Mark used as a step. This created a pretty big hole which his rear tire got swallowed up in. Mark and Robert stacked a few rocks and he was able to clear it. He still had to get past the finally wall. This took some effort and ultimately we had to winch him up using Mark's Jeep as a winch point.

Robert finally took his turn. He had the same problems that Bob ran into with the flat boulder pushed even further away now. We stacked a few more rocks and he was almost able to get over the first section. But then his driver-side hub exploded. Now in three wheel drive, he kept pressing up to the last part with a great effort. We all cheered as he just about got out without one wheel working. In the end though, we had to snatch him out using a winch as he couldn't get any further. It was a great effort by everyone!

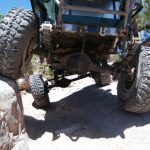
We got back to the trailhead and began to air up our tires when Bob discovered that he had bent his tie rod end and it was causing the toe on his front wheels to be turned too far in to drive it. We put Bob's Jeep up on Robert's trailer and Bob drove Robert's Jeep into town with us following him. We found an auto parts store but unfortunately we were not able to find a replacement tie rod end. Bob ended up driving Robert's Jeep back home with Robert towing Bob's Jeep.

When we went to gas up for the trip home, Mark discovered that his front passenger-side wheel was pretty bent and had air leaking from the bead. He ended up changing it out for his spare tire and off we went. We stopped at the Rockyard back in Castle Rock for some dinner on the way home. All in all it was a great thrill ride for everyone.

at_the_end
bob_out_the_exit_part_1
bob_out_the_exit_part_2
bob_out_the_exit_part_3
bob_out_the_exit_part_4
bob_out_the_exit_part_5
bob_out_the_exit_part_6
bob_out_the_exit_part_7
bob_tire_fold
bob_trail_damage
bob_up_bunker_hill_part_1
bob_up_bunker_hill_part_2
bob_up_bunker_hill_part_3
bob_up_bunker_hill_part_4
bob_up_bunker_hill_part_5
bob_up_bunker_hill_part_6
bob_up_bunker_hill_part_7
bob_up_bunker_hill_part_8
bob_up_bunker_hill_part_9
exit
mark_out_the_exit_part_1
mark_out_the_exit_part_2
mark_out_the_exit_part_3
mark_out_the_exit_part_4
mark_out_the_exit_part_5
mark_tipped_part_1
mark_tipped_part_2
mark_tipped_part_3
mark_tipped_part_4
mark_tipped_part_5
mark_up_bunker_hill_part_1
mark_up_bunker_hill_part_2
mark_up_bunker_hill_part_3
mark_up_bunker_hill_part_4
mark_up_bunker_hill_part_5
mark_up_bunker_hill_part_6
onlookers
robert_out_the_exit_part_1
robert_out_the_exit_part_2
robert_out_the_exit_part_3
robert_out_the_exit_part_4
robert_out_the_exit_part_5
robert_out_the_exit_part_6
robert_out_the_exit_part_7
robert_trail_damage_part_1
robert_trail_damage_part_2
robert_trail_damage_part_3
robert_up_bunker_hill_part_1
robert_up_bunker_hill_part_2
robert_up_bunker_hill_part_3
robert_up_bunker_hill_part_4
robert_up_bunker_hill_part_5
robert_up_bunker_hill_part_6

Report from a Different Day

September 9, 2006

Led by Monica I.
Though we had done Liberty Trail a couple of times before, we always chose to take the long way out back the way we came rather than the quicker way out Independence Trail. The way out "Indy" is much more difficult, and we always opted out of it. This time…
Join Us!
If you aren’t a Member or Subscriber, you can’t see all of the content on this site. Get membership information to see why this site is best when you join and log in

Information for Subscribers

When you log in you’ll see more information here:

  • Recent Community Forum posts
  • Recent polls
  • Upcoming Events you can attend
  • Links to online users

© 2000-2021 · TrailDamage.com · Terms and Conditions · About · Contact
Trail information is only accurate on the date posted. Trails may have changed or closed since that date. Use this information for historical purposes only.
Contact the Forest Service or Bureau of Land Management for up-to-date trail information.

/* ----------------------------------------- */ /* View slug: reports-other-reports-for-same-trail-slider - start */ /* ----------------------------------------- */ /* place the prev/next controls on the sides */ .td-transition-controls .wpv-filter-next-link, .td-transition-controls .wpv-filter-previous-link { border: none; font-size: 300%; position: absolute; top: 70px; } .td-transition-controls .wpv-filter-previous-link { left: 0; } .td-transition-controls .wpv-filter-next-link { right: 0; } /* center the page selector horizonatally */ .td-transition-controls ul.wpv_pagination_dots { text-align: center; margin-top: 10px; } /* center the page selector horizonatally */ .td-transition-controls ul.wpv_pagination_dots li.wpv_pagination_dots_item, .td-transition-controls .wpv_pagination_dots li a { display: inline-block; float: none; } /* remove the default styles */ .td-transition-controls .wpv_pagination_dots li a { text-decoration: none; border-bottom: none; } .td-slider-container { padding: 0 25px; margin-bottom: 20px; position: relative; width:100%; display:table; } .td-slides { position: relative; } .td-slides-image { float:left; display:table-cell; } .td-slides-image img { border:1px solid #c0c0c0; } .td-slides-content { padding:4px 4px 4px 10px; border-top:1px solid #c0c0c0; border-right:1px solid #c0c0c0; border-bottom:1px solid #c0c0c0; display:table-cell; height:227px; overflow:hidden; } .td-slides-content h3 { margin-top:8px; } .td-slides-leader { font-size:smaller; margin-top:4px; } /* ----------------------------------------- */ /* View slug: reports-other-reports-for-same-trail-slider - end */ /* ----------------------------------------- */
/* ----------------------------------------- */ /* Content Template: Template for a Single Report - start */ /* ----------------------------------------- */ .entry-header { display:none; } .entry-content h1 { margin-top:16px; padding-top:0; } h1 a { color:#222; } h1 a:hover { color:#666; } p.entry-meta { font-size:small; } #report-body-spacer { clear:both; width:100%; height:20px; } #addtoany-bar { margin-bottom:2em; text-align:center; } .category-reports .post-info .author, .post-info .date { display: none; } .addthis_recommended_horizontal { text-align:center !important; } /* ----------------------------------------- */ /* Content Template: Template for a Single Report - end */ /* ----------------------------------------- */ /* ----------------------------------------- */ /* Content Template: Loop item in REPORTS Runners - start */ /* ----------------------------------------- */ #runners-container { width:100%; clear:both; } .runner { border:1px solid #c0c0c0; margin:0 6px 6px 0; float:left; width:49%; height:81px; } .runner-image { float: left; } .runner-image img { margin:2px 10px 0 2px; height:75px; width:75px; } .runner-name { text-transform:uppercase; } .runner-name a { color:#222; } .runner-name a:hover { color:#666; } .runner-vehicle { font-size:small; } @media only screen and (max-width: 768px) { .runner { width:100%; } } /* ----------------------------------------- */ /* Content Template: Loop item in REPORTS Runners - end */ /* ----------------------------------------- */