TrailDamage.com

Photos, videos and information about 4x4 trails in Colorado and Utah

  • Trails
    • Colorado
    • Utah
  • Reports
    • Featured Photos
    • Featured Videos
    • Reports Calendar
  • Members
  • Search
  • Trail Damage Winners
  • FAQ
  • Community
  • Upcoming Events
  • Membership
  • Log In
  • Facebook
  • Instagram
  • RSS
  • Twitter
  • YouTube

Moab Rim 100523

May 23, 2010 by Monica

Moab Rim

Trail Run on May 23, 2010
Report and photos by Monica I., Trail Leader
View trail information for Moab Rim

Andrew W.
Gray 2002 Jeep Wrangler
Roger R.
Gray 2021 Jeep Wrangler Rubicon 4xe
Bob S.
Green 1997 Jeep Wrangler

We were all heading back for home that day, but three of us decided to do a run on Moab Rim on the way home. We didn't really get out of town on time and we didn't hurry on the trail, so it took a bit longer than expected. Also, massive winds had put so much dirt in the air that it looked very hazy. Still, it was well worth it.

There were a few Jeeps in the parking area when we got there, but they waved us through when we were ready to go. They would be behind us on the way up, though with plenty of distance between our groups. They went back down after the first overlook so we didn't see them again after that.

Everyone had their own approach to the Devils Crack. Roger spun his way to the top followed by Andrew and then Bob. No one had any issues.

The small set of stairs just after Devils Crack is sneaky. It looks easy, but it's set on a serious tilt. It's the one obstacle to really mess with your head. Everyone noticed that about halfway through it.

We all enjoyed the climbs and descents on slickrock on our way up. They all seem so minor, but with the whole trail at a slant they all get a little more difficult. That coupled with the fact that the edge of the rock is very nearby makes it daunting in places. It's definitely a unique trail because of that.

The close-up views of the river below weren't as close when we got to the Z Turn. Everyone got out to plan their line, but the obstacle had gotten quite a bit wider. Posts and cable had been put up to keep people out of the sand, but the rest of the slickrock was up for negotiation.

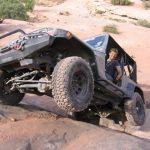
Roger went up first, following his planned line perfectly. The top of the Z Turn looks like it's the easy part, but it really isn't. Roger didn't have to work on it too much, though, and soon he was through the obstacle.

Andrew went next, making the bottom half look really easy. But even he had issues on the top half before finding the line that worked for him.

Bob sailed right through the bottom part but also had issues at the top. He ended up frustrated with it and gave it more gas pedal, bouncing in the air all the way to the top of the final stairs. It was very dramatic!

After the Z Turn, there were many little rocky sections to negotiate. Then the slickrock hill got very steep. There was one last ledge and then we were done with our climb and parked at the first overlook.

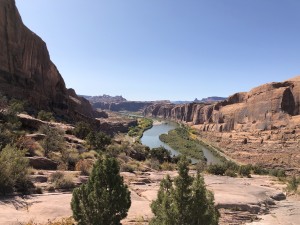
It was windy and it had been windy for a couple of days. Today, the wind was really gusting. It had raised all of the dirt and dust into the air and the entire Moab valley was in a haze. It prevented us from seeing the usual amazing views from Moab Rim, but the views were still impressive. We hung out for a little bit but soon we pressed on.

When we got to the crossroads we took the right side of the "Y" intersection. That took us through some fun slickrock sections that everyone enjoyed. It also took us up to the big, optional dome. Everyone opted to drive right over the top of it.

It's a scary dome, because it wouldn't be difficult to give it gas at the wrong time, toss your front end up in the air, and go end over end for a long time. Luckily, no one did that and we all made it gracefully up and over the top.

We eventually made it to the second overlook, where the wind was really out of control. No one wanted to get too close to the edge, and each of us got tossed a little closer to it at least once when a gust of wind hit our backs. We quickly ate a little bit of lunch and then turned around to head back.

On the way back, we took the other section of the trail through the sand. It was pretty fun. All three of us tried to drive up the sand hill but no one made it even halfway up. Andrew made it the farthest, though Bob was a close second. No one opted to play on the sand hills for very long, though. We vowed to come back another time when we had more time to play.

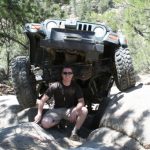
When we were back to the first overlook, both Andrew and Bob spent some time tightening loose bolts for the drive home. They were both happy with the results. Highway driving in a lifted Jeep is tough enough without loose components.

The trip down may be even more intimidating than the trip up the mile of slickrock. The Z Turn didn't give anyone any trouble, which was good.

When we got to Devils Crack we planned the route to keep us the most level. If the obstacle was on flat ground, the line we chose wouldn't make much sense. But on the Moab Rim trail it worked perfectly. No one leaned toward the edge and everyone made it down without hitting bumpers on anything.

After that, we were soon down to the parking area. Everyone aired up and we were on our way. Andrew stayed another night in Moab while Bob and Roger headed out of town. It was the perfect way to wrap up a really great week in Moab.

andrew_and_bob
andrew_at_the_start
andrew_climbing
andrew_down_the_first_bump
andrew_down_the_z_turn_part_1
andrew_down_the_z_turn_part_2
andrew_down_the_z_turn_part_3
andrew_down_the_z_turn_part_4
andrew_down_the_z_turn_part_5
andrew_in_scenery
andrew_on_rocks
andrew_on_the_last_bump
andrew_on_the_trail
andrew_tippy
andrew_up_devils_crack_part_1
andrew_up_devils_crack_part_2
andrew_up_the_z_turn_part_1
andrew_up_the_z_turn_part_2
andrew_up_the_z_turn_part_3
andrew_up_the_z_turn_part_4
andrew_up_the_z_turn_part_5
andrew_up_the_z_turn_part_6
bob_aired_down
bob_and_his_jeep
bob_at_the_start
bob_contemplating_life
bob_down_the_first_bump
bob_down_the_tippy_ledges_part_1
bob_down_the_tippy_ledges_part_2
bob_down_the_z_turn_part_1
bob_down_the_z_turn_part_2
bob_down_the_z_turn_part_3
bob_down_the_z_turn_part_4
bob_down_the_z_turn_part_5
bob_in_sand_part_1
bob_in_sand_part_2
bob_in_scenery
bob_on_bumps
bob_on_rocks
bob_on_the_last_bump
bob_on_the_trail
bob_up_devils_crack_part_1
bob_up_devils_crack_part_2
bob_up_the_z_turn_part_1
bob_up_the_z_turn_part_2
bob_up_the_z_turn_part_3
bob_up_the_z_turn_part_4
bob_up_the_z_turn_part_5
bob_up_the_z_turn_part_6
climb
curve
devils_crack
early_climbing
go_right_first
little_arch
poison_spider_mesa
preparing_for_devils_crack
roger_at_the_start
roger_climbing
roger_down_the_first_bump
roger_down_the_z_turn_part_1
roger_down_the_z_turn_part_2
roger_down_the_z_turn_part_3
roger_down_the_z_turn_part_4
roger_down_the_z_turn_part_5
roger_on_rocks
roger_up_a_ledge
roger_up_devils_crack_part_1
roger_up_devils_crack_part_2
roger_up_the_dome_part_1
roger_up_the_dome_part_2
roger_up_the_dome_part_3
roger_up_the_z_turn_part_1
roger_up_the_z_turn_part_2
roger_up_the_z_turn_part_3
roger_up_the_z_turn_part_4
roger_up_the_z_turn_part_5
sand_and_rock
second_overlook_ahead
start_of_the_trail
starting_down
top_of_the_dome
trail_ahead
view_from_devils_crack
view_from_the_first_overlook_part_1
view_from_the_first_overlook_part_2
view_from_the_first_overlook_part_3
view_from_the_first_overlook_part_4
view_from_the_second_overlook_part_1
view_from_the_second_overlook_part_2
view_from_the_second_overlook_part_3
z_turn

Reports from Other Days: 4

Use the arrows or dots to flip through the previews of the other reports for Moab Rim. Click one of them to read more and see all of the photos from that day.

October 20, 2019

Led by Matt K.
We aired down in the parking area by the start of Moab Rim trail. The parking lot was mostly empty. After airing down, we started going up Moab Rim. It did not take long to get to the first obstacle which is called Devil’s Crack. We both had to try…
»
  • 1
  • 2
  • 3
  • 4
Join Us!
If you aren’t a Member or Subscriber, you can’t see all of the content on this site. Get membership information to see why this site is best when you join and log in

Information for Subscribers

When you log in you’ll see more information here:

  • Recent Community Forum posts
  • Recent polls
  • Upcoming Events you can attend
  • Links to online users

© 2000-2022 · TrailDamage.com · Terms and Conditions · About · Contact
Trail information is only accurate on the date posted. Trails may have changed or closed since that date. Use this information for historical purposes only.
Contact the Forest Service or Bureau of Land Management for up-to-date trail information.

/* ----------------------------------------- */ /* View slug: reports-other-reports-for-same-trail-slider - start */ /* ----------------------------------------- */ /* place the prev/next controls on the sides */ .td-transition-controls .wpv-filter-next-link, .td-transition-controls .wpv-filter-previous-link { border: none; font-size: 300%; position: absolute; top: 70px; } .td-transition-controls .wpv-filter-previous-link { left: 0; } .td-transition-controls .wpv-filter-next-link { right: 0; } /* center the page selector horizonatally */ .td-transition-controls ul.wpv_pagination_dots { text-align: center; margin-top: 10px; } /* center the page selector horizonatally */ .td-transition-controls ul.wpv_pagination_dots li.wpv_pagination_dots_item, .td-transition-controls .wpv_pagination_dots li a { display: inline-block; float: none; } /* remove the default styles */ .td-transition-controls .wpv_pagination_dots li a { text-decoration: none; border-bottom: none; } .td-slider-container { padding: 0 25px; margin-bottom: 20px; position: relative; width:100%; display:table; } .td-slides { position: relative; } .td-slides-image { float:left; display:table-cell; } .td-slides-image img { border:1px solid #c0c0c0; } .td-slides-content { padding:4px 4px 4px 10px; border-top:1px solid #c0c0c0; border-right:1px solid #c0c0c0; border-bottom:1px solid #c0c0c0; display:table-cell; height:227px; overflow:hidden; } .td-slides-content h3 { margin-top:8px; } .td-slides-leader { font-size:smaller; margin-top:4px; } /* ----------------------------------------- */ /* View slug: reports-other-reports-for-same-trail-slider - end */ /* ----------------------------------------- */
/* ----------------------------------------- */ /* Content Template: Template for a Single Report - start */ /* ----------------------------------------- */ .entry-header { display:none; } .entry-content h1 { margin-top:16px; padding-top:0; } h1 a { color:#222; } h1 a:hover { color:#666; } p.entry-meta { font-size:small; } #report-body-spacer { clear:both; width:100%; height:20px; } #addtoany-bar { margin-bottom:2em; text-align:center; } .category-reports .post-info .author, .post-info .date { display: none; } .addthis_recommended_horizontal { text-align:center !important; } /* ----------------------------------------- */ /* Content Template: Template for a Single Report - end */ /* ----------------------------------------- */ /* ----------------------------------------- */ /* Content Template: Loop item in REPORTS Runners - start */ /* ----------------------------------------- */ #runners-container { width:100%; clear:both; } .runner { border:1px solid #c0c0c0; margin:0 6px 6px 0; float:left; width:49%; height:81px; } .runner-image { float: left; } .runner-image img { margin:2px 10px 0 2px; height:75px; width:75px; } .runner-name { text-transform:uppercase; } .runner-name a { color:#222; } .runner-name a:hover { color:#666; } .runner-vehicle { font-size:small; } @media only screen and (max-width: 768px) { .runner { width:100%; } } /* ----------------------------------------- */ /* Content Template: Loop item in REPORTS Runners - end */ /* ----------------------------------------- */